

As a child, I remember those lazy afternoons when the sweet smell of melting chocolate wafted through the air, mingling with the nutty aroma of peanut butter. It was during one of these perfect moments that I first laid my eyes on Classic Homemade Peanut Butter Cups, a delightful concoction that brought together two of my favorite flavors. Standing on a stool in the kitchen, my heart raced as I helped my mom mix the warm peanut butter and sugar, dreaming about the bites of bliss that would soon follow. There’s something magical about creating a beloved treat from scratch and watching it transform into something wonderful. It wasn’t just food; it was love, memories, and a moment shared.
Flavor and Popularity
The Unique Flavor Profile of Classic Homemade Peanut Butter Cups
When you take a bite of Classic Homemade Peanut Butter Cups, it’s as if you step back into the happiest, most carefree moments of your childhood. These treats are a harmonious blend of creamy, rich peanut butter and decadent, smooth chocolate—every mouthful dances on your palate. The base layer of crunchy yet velvety chocolate brings forth a sweetness that perfectly complements the saltiness of the peanut butter filling. It’s this balance that makes Classic Homemade Peanut Butter Cups an irresistible delight—one that recalls countless family gatherings, summer picnics, and cozy movie nights.
Why This Recipe Is a Family Favorite and Crowd-Pleaser
The charm of Classic Homemade Peanut Butter Cups transcends generations. They are simple enough for the kids to help make yet indulgent enough to please adults. Whether it’s a birthday party or a quiet evening at home, these sweet treats always draw people in. They are a testament to the idea that food is best shared, sparking conversations and laughter. When I make these at home, friends often gather, and stories blend seamlessly with the warmth of chocolate melting in the air, reminding me why I fell in love with cooking all those years ago.
Ingredients and Preparation
Essential Ingredients and Possible Substitutions
To create the perfect batch of Classic Homemade Peanut Butter Cups, you need just a handful of ingredients, each playing a crucial role in unleashing flavor.
- Milk Chocolate: The star of the show! Feel free to use dark chocolate or semi-sweet chocolate depending on your palate.
- Peanut Butter: Creamy or crunchy—it’s your choice! Natural peanut butter is ideal because of its rich flavor.
- Powdered Sugar: This sweetener harmonizes the textures, making the peanut butter filling pleasantly sweet without becoming too cloying.
- Butter: Helps to achieve that smooth chocolate layer that envelops the peanut butter.
Possible Substitutes:
- Use almond butter for a nutty twist!
- Try coconut oil for a vegan-friendly chocolate shell.
Step-by-Step Recipe Instructions with Tips
Before you dive in, gather your ingredients and tools. You’ll need a muffin tin and baking cups if you want to get that classic shape.
- Melt the Chocolate: In a microwave-safe bowl, melt 1 cup of milk chocolate chips with 2 tablespoons of butter in 30-second intervals, stirring between each until smooth.
- Prepare the Muffin Tin: Line a muffin tin with paper liners.
- Create the Chocolate Base: Pour a tablespoon of melted chocolate into each liner and use the back of a spoon to spread it evenly across the bottom. Chill for about 15 minutes until set.
- Make the Peanut Butter Filling: In a medium bowl, mix 1 cup of peanut butter and 1 cup of powdered sugar until creamy. You can enhance it with a pinch of salt if you like a salty-sweet profile.
- Fill the Cups: After the chocolate layer is set, spoon a generous amount of the peanut butter mixture into each cup, leaving some space at the top for more chocolate.
- Top with Chocolate: Pour an additional layer of melted chocolate over the peanut butter to cover completely. Make sure they are sealed!
- Final Chill: Refrigerate for at least an hour until fully set before enjoying.
Tips:
- For a little crunch, try adding crushed nuts on top of the peanut butter before sealing with chocolate.
- Don’t have muffin liners? Silicone molds work just as well!
Cooking Techniques and Tips
How to Cook Classic Homemade Peanut Butter Cups Perfectly
Cooking is all about technique. Melting your chocolate too fast can lead to a seizing effect, ruining that silky smooth layer. Use a double boiler if possible, or remember to work with low heat to maintain that creamy consistency. Avoid using fresh peanut butter directly from the fridge, as it should be at room temperature to blend well with the powdered sugar.
Common Mistakes to Avoid
One of the common pitfalls is not letting your chocolate layers set appropriately. Patience is key, and rushing this step could lead to a gooey, messy result. Furthermore, mixing your filling too vigorously can lead to an unwanted texture; gently fold the sugar in for smoothness.
Health Benefits and Serving Suggestions
Nutritional Value of Classic Homemade Peanut Butter Cups
While indulgent, Classic Homemade Peanut Butter Cups can offer nutritional benefits as well! Peanut butter provides protein, healthy fats, and nutrients like magnesium and vitamin E. Moreover, when made with high-quality chocolate, they contribute antioxidants to your diet.
Best Ways to Serve and Pair This Dish
Serve these delicious cups as a delightful dessert at gatherings, or simply satisfy your cravings at home. Pair them with a glass of cold milk for an absolute classic experience, or try them with coffee for a rich afternoon treat. They also make for thoughtful gifts, packaged in beautiful boxes to share your love with others.

FAQ Section
What type of chocolate is best for Classic Homemade Peanut Butter Cups?
The best chocolate to use is milk chocolate for its sweetness and creaminess. However, dark chocolate provides a rich, intense flavor that pairs beautifully with the peanut butter if you prefer something less sweet.
Can I use natural peanut butter instead of processed?
Absolutely! Natural peanut butter offers great flavor and creaminess. The only difference is that natural peanut butter separates, so stir it well before measuring for the recipe.
How do I store leftover Classic Homemade Peanut Butter Cups?
Store them in an airtight container in the refrigerator to maintain freshness. They will last for about a week, though I doubt they’ll last that long!
Can I freeze Classic Homemade Peanut Butter Cups?
Yes, you can freeze them! Just make sure they are well-wrapped in plastic wrap and stored in an airtight container. They will be good for about three months. For best results, let them thaw in the fridge before enjoying.
Conclusion
If you’re like me and have a soft spot for sweet, creamy delights, then Classic Homemade Peanut Butter Cups will surely charm your heart and taste buds. There’s something comforting about crafting these little gems from scratch that connects you to your loved ones, an experience that transcends mere cooking. Trust me, you’ll want to make this recipe again and again. So gather your loved ones, roll up your sleeves, and create something sweet today!
Print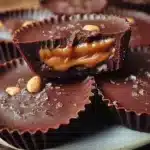
Classic Homemade Peanut Butter Cups
- Total Time: 45 minutes
- Yield: 12 servings 1x
- Diet: Vegetarian
Description
Delightful homemade peanut butter cups blending creamy peanut butter and rich chocolate, perfect for sharing and savoring nostalgic moments.
Ingredients
- 1 cup milk chocolate chips
- 2 tablespoons butter
- 1 cup creamy or crunchy peanut butter
- 1 cup powdered sugar
Instructions
- Melt the chocolate: In a microwave-safe bowl, melt 1 cup of milk chocolate chips with 2 tablespoons of butter in 30-second intervals, stirring each time until smooth.
- Prepare the muffin tin: Line a muffin tin with paper liners.
- Create the chocolate base: Pour a tablespoon of melted chocolate into each liner and spread it evenly using the back of a spoon. Chill for about 15 minutes until set.
- Make the peanut butter filling: In a medium bowl, mix 1 cup of peanut butter and 1 cup of powdered sugar until creamy. Optionally, add a pinch of salt.
- Fill the cups: After the chocolate layer is set, spoon a generous amount of the peanut butter mixture into each cup, leaving space at the top.
- Top with chocolate: Pour an additional layer of melted chocolate over the peanut butter to cover completely and seal.
- Final chill: Refrigerate for at least an hour until fully set before enjoying.
Notes
For extra crunch, add crushed nuts on top of the peanut butter filling before sealing with chocolate. Store in an airtight container in the refrigerator for freshness.
- Prep Time: 15 minutes
- Cook Time: 30 minutes
- Category: Dessert
- Method: Chilling
- Cuisine: American
Nutrition
- Serving Size: 1 cup
- Calories: 200
- Sugar: 15g
- Sodium: 60mg
- Fat: 12g
- Saturated Fat: 4.5g
- Unsaturated Fat: 6g
- Trans Fat: 0g
- Carbohydrates: 20g
- Fiber: 1g
- Protein: 4g
- Cholesterol: 10mg
Keywords: peanut butter cups, homemade candy, dessert recipe, chocolate treats